Lafferty Equipment Manufacturing, LLC

Installation & Operation Instructions

Model # 935202 · Satellite Teat Foamer

Requirements

For use with 935200 Teat Foamer System

Options

Stainless Steel Hose Racks
Large Stainless Steel Hose Rack# 224150
Small Stainless Steel Hose Rack# 224145
Extended Hose (Order in 25' Increments)
Hose, Twin Line, Blue (Added to Standard Length)# 800100FT
935202
Warning! Read All Instructions Before Using Equipment!

Overview

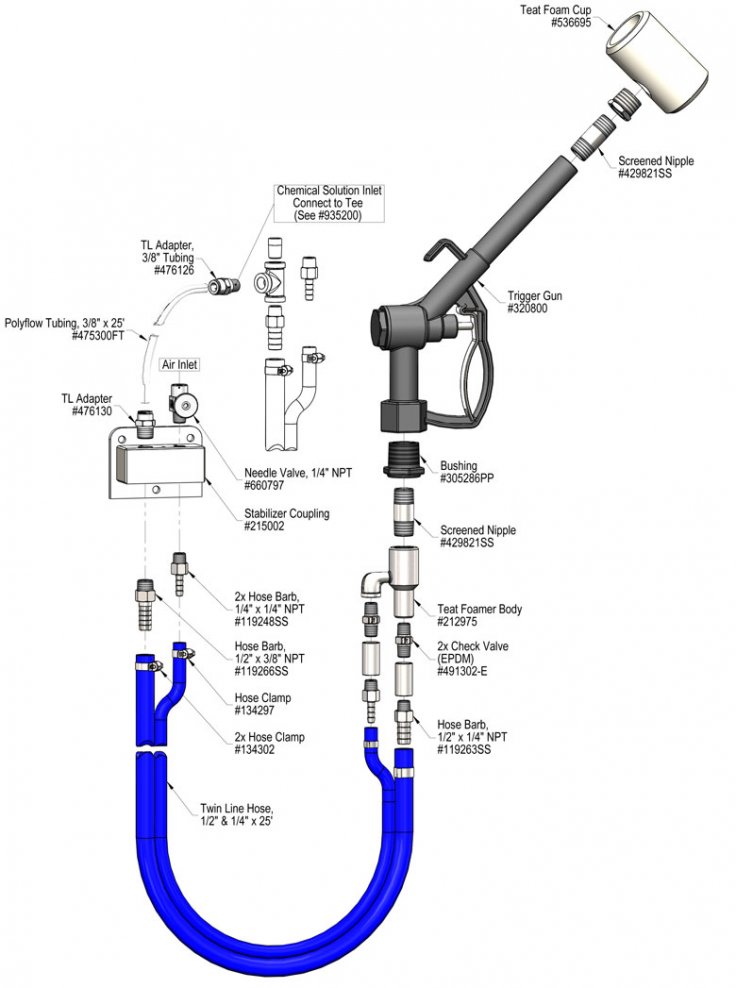
The Satellite Teat Foamer is a foam applicator for foaming teat dips in dairy facilities. Up to 8 Satellite Teat Foamers can be used in conjunction with a Teat Foamer, depending on installation set-up and how many will be in use at the same time. The Teat Foamer is a pump-driven system that uses compressed air to power an AODD pump to draw and pressurize ready-to-use teat dip. The solution flows through the discharge hose to the foamer body where rich, clinging foam is created by injecting compressed air into the solution. A low volume of clinging foam is then applied using the heavy-duty machined polypropylene teat foam cup.

Safety & Operational Precautions

  • For proper performance do NOT modify, substitute nozzle, hose diameter or length
  • Manufacturer assumes no liability for the use or misuse of this unit.
  • Wear protective clothing, gloves and eye-wear when working with chemicals.
  • Always direct the discharge away from people and electrical devices.
  • Follow the chemical manufacturer’s safe handling instructions.
  • DO NOT use d-Limonene or other chemicals that are not compatible with the Santoprene diaphragms.
  • Viton upgrade is available.

To Install (refer to diagram on next page)

This Satellite Teat Foamer is for use with Model Number 935200 - Teat Foamer.

  1. Mount this Satellite Teat Foamer at the location of your choice.
  2. Connect the provided tube lock solution line to solution inlet port on the Satellite manifold.
  3. Run the provided tube lock solution line from the Satellite to the the Teat Foamer.
  4. Remove the plug from the Tee on the solution discharge of the Teat Foamer.
  5. Connect the tube lock solution line from the Satellite to Tee on the Teat Foamer.
  6. Connect a compressed air line the air inlet side of the Satellite manifold.

To Operate

  • The unit has been tested and is ready to operate, the air pressure preset at 60 PSI. This is the optimum pump pressure. Test "as is" before making any adjustments.
  • To adjust foam consistency, turn the foam consistency needle valve VERY slightly counterclockwise a maximum of 1/8th turn for dryer foam and clockwise for wetter foam.
  1. Open the inlet air ball valve.
  2. With the trigger gun in hand direct the discharge in a safe direction and pull the trigger to fill the cup.
  3. If the flow of foam surges, the needle valve is open too much, reduce the air flow by turning the needle valve clockwise until the foam flow stabilizes.
  4. A medium-wet foam will give the best results! Very dry foam will not clean as well.
  5. Dip each teat in the cup and pull the trigger to refill cup as needed.

Metering Tip Selection

Metering Tip Color
oz/Min
Dilution Ratio @ 40 PSI
Brown
0.56 154.4:1
Clear
0.88 97.9:1
Bright Purple
1.38 62.1:1
White
2.15 39.5:1
Pink
2.93 28.7:1
Corn Yellow
3.84 21.7:1
Dark Green
4.88 16.8:1
Orange
5.77 14.1:1
Gray
6.01 13.5:1
Light Green
7.01 11.4:1
Med. Green
8.06 9.8:1
Clear Pink
9.43 8.2:1
Yellow Green
11.50 6.6:1
Burgundy
11.93 6.3:1
Pale Pink
13.87 5.3:1
Light Blue
15.14 4.7:1
Dark Purple
17.88 3.9:1
Navy Blue
25.36 2.4:1
Clear Aqua
28.60 2.0:1
Black
50.00 -
No Tip  1:1
The dilution ratios above are approximate values. Due to chemical viscosity, actual dilution ratios may vary.

Formula

GPM × 128 ÷ Desired Dilution Ratio = oz/min

  • See Unit Flow Rates chart for GPM
  • Use 20 for 20:1 dilution ratio, 30 for 30:1, etc.
  • Match calculated ounces per minute (oz/min) to nearest oz/min in Metering Tip Selection chart.

unit Flow Rates

Pressure Flow Rate
PSI GPM
60 .68
935202.jpg
Troubleshooting Guide
Problem Possible Cause / Solution
StartupMaintenance
A) Air pump will not run/will not pump.
B) Pump runs too fast with no output.
C) Unit will not draw chemical, poor foam quality.
1, 2, 3, 4, 7
1, 4
1, 3, 4, 8
9, 12, 13, 14, 15
9, 10, 11, 12, 13, 14,15
9, 10, 11, 12, 13, 15
Possible Cause / Solution
StartupMaintenance
  1. Air pressure too high or too low (60 PSI factory set)
    • Open air ball valve fully.
    • Adjust the air regulator clockwise to increase pressure or counterclockwise to decrease
    • Do not exceed 90 PSI. Higher pressure will cause permanent damage to the air pump.
  2. IF discharge hose is long.
    • Give it plenty of time to fill the hose and reach the end.
  3. Discharge hose kinked
  4. Suction tube not immersed / Chemical depleted
    • ​​​​​​​Fully immerse tube
    • Replenish chemical
  5. Dilution too weak
    • ​​​​​​​Adjust dilution to be stronger.
  6. Improper chemical
    • ​​​​​​​Ensure product is recommended for foaming and/or the application.
  7. Ice particles from condensation in air line — Air pump can periodically "freeze up" (stall) due to ice particles in the pump's exhaust (depending on air humidity & other factors)
    • WAIT several seconds to allow the ice particles to melt and blow out, at which time the pump will automatically resume pumping.
  1. Foam output too wet
    • Turn foam consistency knob very slightly counterclockwise.
  2. Suction tube(s) blocked or stretched out where tube slides over hose barb or pin hole/cut in tube (sucking air in)
    • Clean strainers. (Replace if missing.)
    • Cut off end of tube or replace tube.
  3. Vacuum leak in solution pick-up connections (sucking air in)
    • ​​​​​​​Check and tighten suction connections.
  4. Chemical check valve stuck or clogged
    • ​​​​​​​Clean or replace.​​​​​​​
  5. Foamer body, screened nipples or gun media (not shown) clogged up with dried chemical
    • ​​​​​​​Clean/flush out with hot water, soak in a de-scaling acid or replace nipple or media.
  6. Air regulator / Air filter clogged or failed
    • ​​​​​​​Clean or replace
  7. Problem with air pump
  8. Use of an oiler in the airline will cause poor performance or cause pump to stall and cause damage.
PREVENTIVE MAINTENANCE: When the unit will be out of service for extended periods, place chemical tube(s) in water and flush the chemical out of the unit to help prevent chemical from drying out and causing build-up. Periodically check and clean chemical strainer and replace if missing.