Lafferty Equipment Manufacturing, LLC

Installation & Operation Instructions

Model # 912820 · Portable 20 Gallon Conveyor Mate Foam System

Requirements

Chemical Concentrate
Water
Temperature up to 160°F
Pressure 30 to 250 PSI
Flow 1.34 GPM @ 35 PSI
Supply Line 1/2"
Compressed Air up to 5 CFM
Hose 3/4" ID x 10'
Nozzle 80150 x 2
912820
Warning! Read All Instructions Before Using Equipment!

Overview

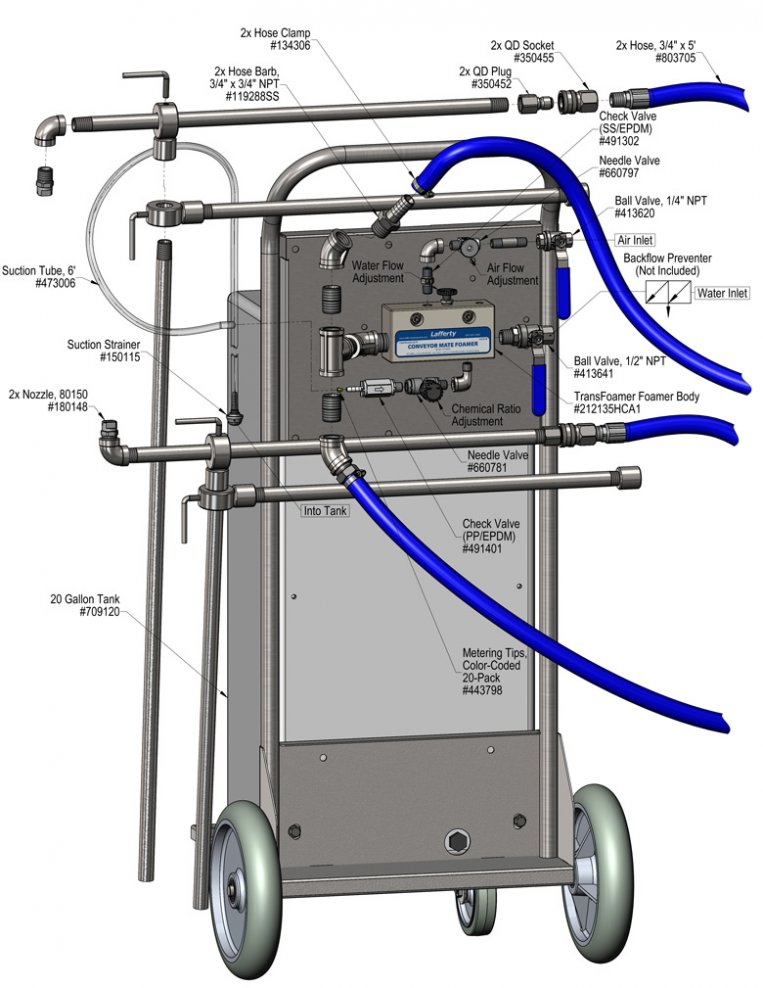
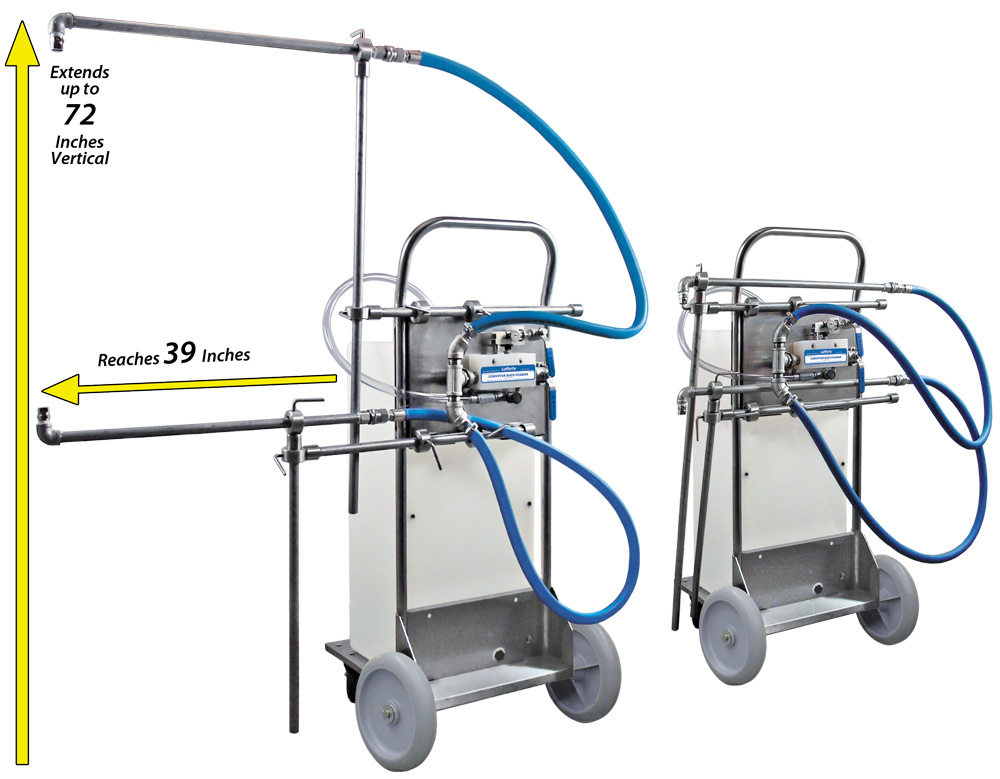
The Conveyor Mate is an adjustable foam applicator for Clean-In-Place foam application onto conveyor belts and other equipment. Featuring an all stainless steel cart assembly, this venturi injection system uses city or boosted water pressure (35 - 250 PSI) to draw and blend chemical concentrate from the attached tank into the water stream to create an accurately diluted solution. Rich, clinging foam is created by injecting compressed air into the foaming solution to greatly expand volume and coverage ability. This foamer can be set to achieve the desired foaming consistency and cleaning results by adjusting the chemical, water and air flow. The adjustable length/height extension arms allow the unit to foam conveyor belts up to 4 feet wide.

Safety & Operational Precautions

  • When connecting to a potable water supply follow all local codes for backflow prevention.
  • For proper performance do NOT modify, substitute nozzle, hose diameter or length.
  • Manufacturer assumes no liability for the use or misuse of this unit.
  • Wear protective clothing, gloves and eye wear when working with chemicals.
  • Always direct the discharge away from people and electrical devices.
  • Follow the chemical manufacturer's safe handling instructions.
  • NEVER mix chemicals without first consulting chemical manufacturer.

To Install (refer to diagram on next page)

  1. Remove lid of chemical container and fill with desired quantity of concentrated chemical, up to 20 gallons.
  2. Replace lid, ensure that chemical suction tube is immersed in the chemical and connect and clamp the suction tube to the check valve at the unit as shown.
  3. Push Conveyor Mate system to the desired location.
  4. Connect the water and compressed air supply as shown in the diagram opposite.
  5. Set arms over and under the center of the conveyor by loosening the L-handles on each arm and positioning the arms at the desired horizontal and vertical locations.
  6. Connect the hoses to the foam bars as shown.
How to Set Your Dilution Ratio:
  • The chemical needle valve allows you to achieve wide range of dilution ratios.
  • Turn chemical needle valve counterclockwise to increase chemical or clockwise to decrease.
  • Turn counterclockwise (open) in slight increments till required performance is achieved.

To Operate

  1. Completely open the water and air ball valves
     
  2. Observe the output.
    • To adjust the width of the foam discharge pattern, turn the water needle valve in slight increments counterclockwise for a wider pattern or clockwise for a more narrow pattern. You may also adjust the width of the foam discharge pattern by rotating the foam bar from the vertical position to change the angle of the nozzle.
    • To adjust foam quality, turn the air needle valve only in slight increments.
    • If the foam surges, turn the chemical needle valve counterclockwise to adjust the chemical dilution ratio, or turn the air needle valve very slightly clockwise to "fine tune" the air volume. (Also see the Troubleshooting Guide, Page 4)
       
  3. When foaming is complete:
    • Close the water ball valve
    • Allow the hoses to clear out.
    • Close the air ball valve.

Unit Flow Rates

PSIGPM
301.24
401.43
501.60
601.75
701.90
802.03
902.15
1002.27
1102.38
1202.48
1302.58
1402.68
1502.77
1602.87
1702.95
1803.04
1903.12
2003.20
2103.28
2203.36
2303.44
2403.51
2503.58
912820.jpg
Troubleshooting Guide
Problem Possible Cause / Solution
StartupMaintenance
A) Foam surges and/or hose "bucks".
B) Foamer will not draw chemical.
C) Foam too wet.
D) Foam does not clean properly (too dry).
E) Using too much chemical.
F) Water/chemical backing up into air line.
G) Water backing up into chemical container.
1, 2, 3, 4, 6, 7, 8, 9, 10
1, 3, 4, 7, 8, 9, 10
2, 3, 4, 6, 7, 8, 9, 10
1, 4, 6, 11
5

12, 13, 14, 15, 16, 18, 19
12, 13, 14, 15, 16, 18, 19
13, 14, 15, 16, 18, 19


17
12
Possible Cause / Solution
StartupMaintenance
  1. Air volume too high
    • Adjust the needle valve slowly counterclockwise.
  2. Use of an oiler in the airline will cause poor foam quality
    • Use only clean, dry air.
  3. Inlet ball valve not completely open
    • Completely open the ball valve.
  4. Not enough chemical -
    • Turn chemical needle valve knob counterclockwise.
  5. Chemical needle valve open too much
    • Turn knob clockwise.
  6. Improper chemical
    • Ensure product is recommended for the application.
  7. Chemical tube not immersed or chemical depleted
    • Immerse tube or replenish.
  8. Discharge hose too long or wrong size or kinked
    • Straighten the hose or replace with correct hose.
  9. Nozzle size too small
    • Replace with correct size nozzle.
  10. Water pressure or water volume too low/inlet piping too small causing poor chemical pick up
    • Increase water pressure or water volume.
  11. Soil has hardened on surface
    • Always rinse foam before it dries
    • Reapplication may be necessary.
  1. Chemical check valve stuck or failed
    • Clean or replace.
  2. Chemical strainer partially blocked
    • Clean or replace chemical strainer.
  3. Chemical tube stretched out or pin hole/cut in tube
    • Cut off end of tube or replace tube.
  4. Vacuum leak in chemical pick-up connections 
    • Tighten the connection.
  5. Needle valve(s) clogged  
    • Clean or replace.
  6. Air check valve failed 
    • Replace.
  7. Water strainer element clogged or missing/foamer inlet orifice clogged 
    • Clean or replace strainer element; check/clean inlet orifice for obstructions.  DO NOT DRILL OUT.
  8. Chemical build-up may have formed in the foamer body causing poor or no chemical pick-up
    • Follow Preventive Maintenance instructions below, using hot water and/or descaling acid. When there is no draw at all, carefully remove fittings and soak entire foamer body in descaling acid.
PREVENTIVE MAINTENANCE: When the unit will be out of service for extended periods, place chemical tube(s) in water and flush the chemical out of the unit to help prevent chemical from drying out and causing build-up. Periodically check and clean chemical strainer and replace if missing.