Lafferty Equipment Manufacturing, LLC

Installation & Operation Instructions

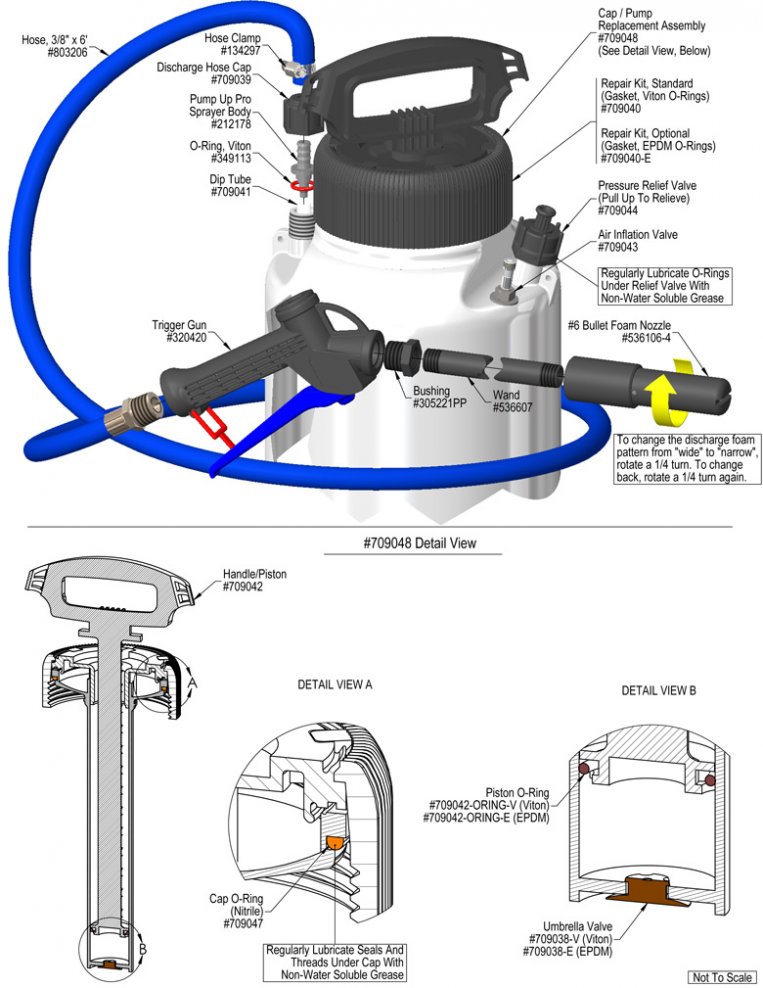
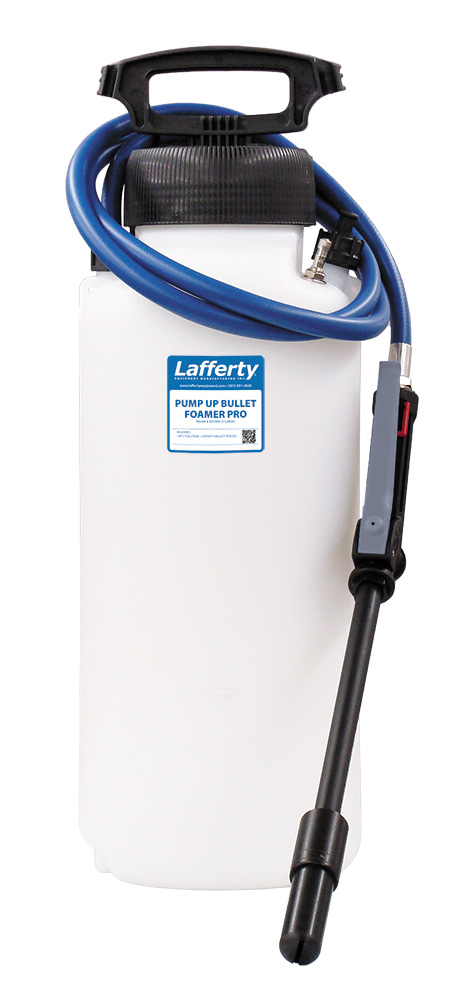
Model # 925008 · Pump Up Bullet™ Foamer Pro, 3 Gallon

Requirements

Ready-to-Use Chemical Solution
Temperature up to 120°F
Accepts Compressed Air up to 45 PSI

Options

Repair Kit
O Ring & Seal Repair Kit (Viton)# 709040
O-Ring & Seal Repair Kit (EPDM)# 709040-E
Silicone Lubricant, 5 Gram Tube# 709049
Proportioning / Filling Options
1-Way Ball Valve Mixing Station (4 GPM)# 985100
1-Way Push Lever Mixing Station (4 GPM)# 981100
925008
Warning! Read All Instructions Before Using Equipment!

Overview

The 3 Gallon Pump-Up Bullet™ Foamer Pro is a portable foam applicator for applying pre-diluted, foaming chemicals to any surface as wet, clinging foam. This professional model features a heavy-duty hose, trigger gun, and extension wand and combines the many advantages of foam cleaning with the familiar ease and portability of a typical pump-up sprayer. Use the compressed air "quick charge" valve to eliminate pumping. The adjustable Bullet™ foam nozzle draws in atmospheric air to create a wet, clinging foam and projects a wide pattern or narrow stream.

Safety & Operational Precautions

  • Manufacturer assumes no liability for the use or misuse of this unit.
  • Wear protective clothing, gloves and eye wear when working with chemicals.
  • Always direct the discharge away from electrical devices and people/animals (as appropriate)
  • Follow the chemical manufacturer's safe handling instructions.
SPECIAL PRECAUTIONS
  • This high density polyethylene unit is fitted with Viton seals. Chemicals and lubricants not compatible with polyethylene or Viton should not be used. (EPDM seals are available for separate purchase.)
  • Do not alter pressure relief valve or plug valve hole.
  • Regularly lubricate pressure relief valve with a non-water-soluble grease (such as a silicone compound) and ensure proper operation, using water in the tank, prior to each use. Regular lubrication of cap seal and threads with a non-water-soluble grease will help ensure proper sealing of cap.
  • Do not lift or carry by the hose or trigger gun.Securely tighten pump: loose pump can be forcibly ejected.
  • Carefully follow chemical manufacturer's safe handling instructions and recommended precautions/practices when using flammable chemicals. Do not use hot liquids.
  • Do not exceed 45 psi pressure and do not inflate without liquid in the tank
  • Do not fill the tank over 3/4 full. Relieving pressure in an overfill condition can cause harmful venting of contents.
  • Never stand with face or body over the top of tank when loosening pump or relieving pressure.
  • After pumping, be sure the handle is in the locked down position
  • On completion of operation, with the tank in the upright position, relieve pressure in the tank by gently pulling up on the pressure relief valve on the side of the tank.

WARNING

This unit is equipped with a built-in inflation valve and can be pressurized using an air compressor. Extra caution is required when using a compressor, as the unit will be pressurized much more rapidly than when hand-pumping. Failure to follow the following procedure could result in serious injury to the operator or others.
 
  1. Before each use of a compressor be certain that:
  1. The umbrella valve, located at the bottom of the cylinder, is installed and functioning properly.
  2. The pump assembly is screwed tightly to the tank.
  3. The pressure relief valve is functioning properly. Check by pulling up on the valve until the red stem shows. The valve stem should move freely and spring back to its original position when released.The O-ring and valve stem must be greased.
  4. Check the hose clamp and tighten if loose.
  1. Additional Precautions:
  1. Do not stand over the pump handle while pressurizing with an air compressor or while releasing the handle from the locked position. Compressed air can cause the pump handle to pop up if the umbrella valve is worn or damaged or if the pressure relief valve is not functioning.
  2. Do NOT leave the airline attached to the tank during operation.

To Install (refer to diagram on next page)

  1. Turn the pump lid counterclockwise to remove pump and lid.

NOTE: Do not remove or tighten the lid using the handle.  Rotational force on the handle can cause damage.

  1. Add water and foaming chemical to the tank. You will have to experiment with each chemical to see how much of the concentrate you will need to add to the water to create foam. Not all chemicals will foam.
  2. Leaving extra "air space" in the tank and less chemical will give longer foaming time between re-pressurizing.  A half-full tank is ideal.  DO NOT FILL THE TANK OVER 3/4 FULL (75%) .
  3. Securely tighten cap and pump for a good seal. (Regular lubrication of cap seal and threads will help ensure proper sealing and removal of cap).
  4. Push the handle down and turn counterclockwise to unlock.
  5. Pump the handle until resistance is felt, this will take several strokes.Continue pumping till the resistance is too hard to pump or pop-off valve starts to rise. Make CERTAIN the handle is in the locked down position.

    NOTE: It is a good idea to thoroughly rinse out the tank, fill with water, partially re-pressurize, and discharge to flush out the entire hose/nozzle assembly after use and before storing foamer.  When using aggressive or corrosive chemicals never leave chemical solution in the tank after use.

To Operate

  1. Pump foamer manually or use a compressed airline to pressurize the tank until the pressure relief valve starts to "relieve". See below if using compressed air.
  2. Pull the trigger to start and stop foaming. Re-pump up as foam begins to slow down.
  3. To switch to a wide or narrow pattern turn the black slotted nozzle clockwise 1/4 turns.
  4. When foaming is completed and prior to any refill while standing to the side away from your person relieve any pressure from the tank by gently pulling up on the pressure relieve valve. Relive all pressure before attempting to remove the lid!
  5. To store: Partially fill the tank with fresh water and pump it up. Pull the trigger and rinse the foamer out.
WHEN USING AN AIR COMPRESSOR: Place pump handle in the unlocked position and pressurize slowly. If the pump handle rises...DISCONTINUE PRESSURIZING! Relieve pressure by pulling up on the pressure relief valve, remove pump and check the umbrella valve for wear or damage. Do not pressurize until worn or damaged parts have been replaced and the handle does not rise during pressurization.
NOTE it is a good idea to thoroughly rinse out tank and re pressurize and flush out entire hose/nozzle assembly after use and before storing foamer.  When using aggressive or corrosive chemicals never leave chemical solution in the tank after use.
925008.jpg
Troubleshooting Guide
Problem Possible Cause / Solution
StartupMaintenance
A) Foamer sputtering or foam not acceptable
B) Foam is too wet
C) No foam output / unit will not foam
D) Tank will not pressurize and/or hold pressure
1, 2
1, 2
1
3, 4

3, 4
3
Possible Cause / Solution
StartupMaintenance
  1. Not enough air pressure
    • Pump up the foamer several strokes
    • Less liquid in the tank will allow for more air pressure to build and foam for longer without re-pumping
    • The air relief valve will rise when maximum pressure is achieved
  2. Solution too weak
    • Increase concentration of chemical solution
  1. Air leaks due to loose lid, worn or damaged components/fittings
    • Ensure lid is snug, but not overtight. Lubricate the lid and pressure relief o-rings. Order repair kit and replace damaged o-rings, gaskets, umbrella valve etc. See page 3 for part numbers
    • Refer to the Pump-Up O-Ring Replacement Guide http://appequip.net/uploads/documents/pump-up-o-ring-replacement.pdf
    • The o-ring on the piston (inside the shaft) creates pressure and should be kept well-lubricated since it is exposed to friction from pumping.  Replace as needed.
    • The umbrella valve on the bottom of the piston shaft holds pressure in the tank and needs to form a tight seal.  Do not scratch the valve seat!  Replace as needed.
    • Ensure that your chemical and lubricant are compatible with the o-ring seals for this equipment.  Incompatible chemicals or lubricants can quickly degrade the o-rings.
  2. Bullet airless foam nozzle clogged or scaled up
    • Chemical build-up may have formed. Soak entire Bullet airless foam nozzle in de-scaling acid.
PREVENTIVE MAINTENANCE: * Prior to storage, empty, clean and dry the foamer. * Lubricate o-ring in pressure relief valve and the piston/cylinder with a compatible non-water soluble grease (such as a silicone lubricant) on a regular basis. * Lubricate tank cap threads and both sides of the gasket to achieve a tight seal and to ease tightening and loosening. * Replace cracked or damaged seals before use.