Lafferty Equipment Manufacturing, LLC

Installation & Operation Instructions

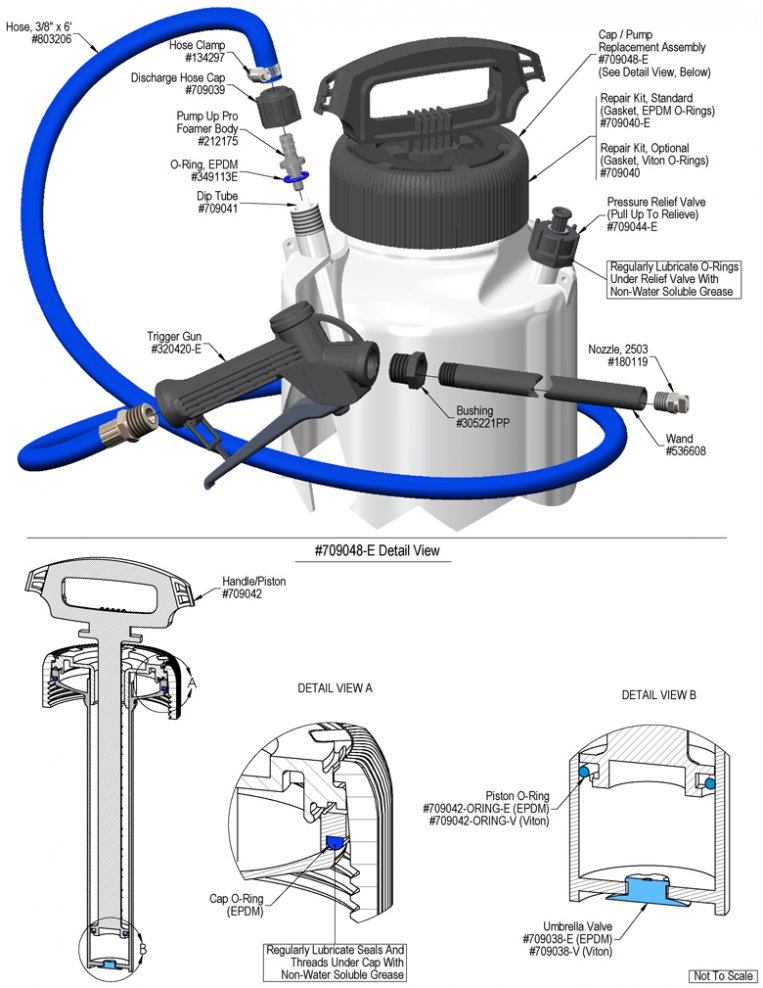
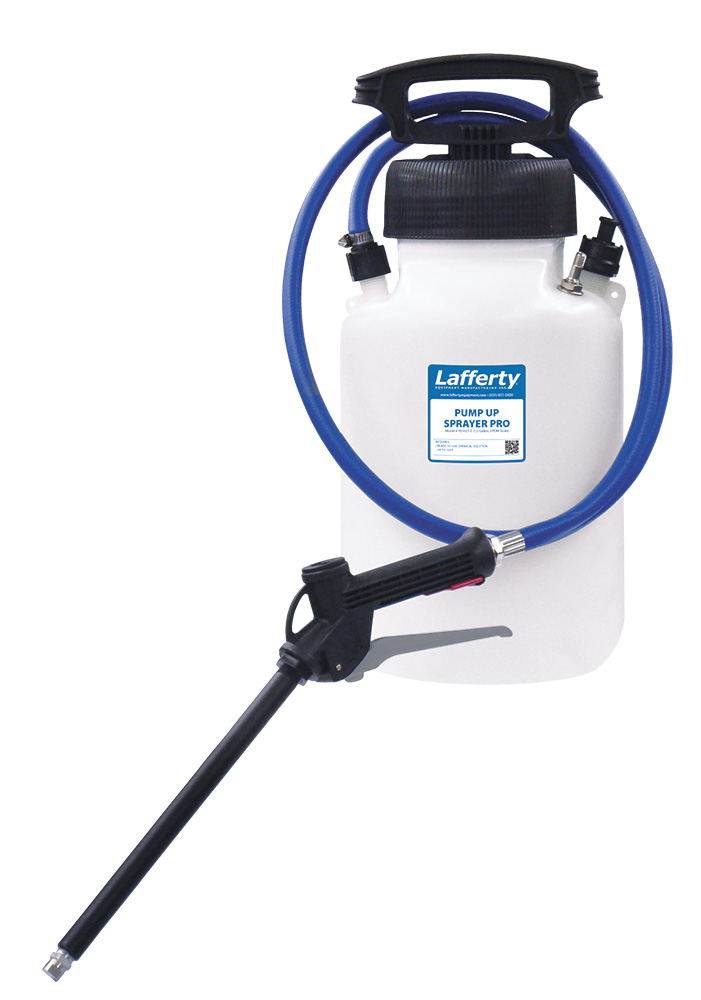
Model # 925023-E · Pump Up Sprayer Pro, 1.5 Gallon (EPDM Seals)

Requirements

Ready-to-Use Chemical Solution
Temperature up to 120°F

Options

Repair Kit
O Ring & Seal Repair Kit (Viton)# 709040
O-Ring & Seal Repair Kit (EPDM)# 709040-E
Silicone Lubricant, 5 Gram Tube# 709049
Proportioning / Filling Options
1-Way Ball Valve Mixing Station (4 GPM)# 985100
1-Way Push Lever Mixing Station (4 GPM)# 981100
925023-E
Warning! Read All Instructions Before Using Equipment!

Overview

The 1.5 Gallon Pump-Up Sprayer PRO is a heavy-duty, portable spray applicator for applying ready-to-use chemicals on to any surface. Includes EPDM o-rings and internal seals. This professional model features a more durable 6' hose, trigger gun, extension wand, and fan nozzle compared to your typical pump-up sprayer.

Safety & Operational Precautions

  • Manufacturer assumes no liability for the use or misuse of this unit.
  • Wear protective clothing, gloves and eye wear when working with chemicals.
  • Always direct the discharge away from electrical devices and people/animals (as appropriate)
  • Follow the chemical manufacturer's safe handling instructions.

SPECIAL PRECAUTIONS

  • This high density polyethylene unit is fitted with EPDM seals. Chemicals and lubricants not compatible with polyethylene or EPDM should not be used. (Viton seals are available for separate purchase.)
  • Do not alter pressure relief valve or plug valve hole.
  • Regularly lubricate pressure relief valve with a non-water-soluble grease (such as a silicone compound) and ensure proper operation, using water in the tank, prior to each use. Regular lubrication of cap seal and threads with a non-water-soluble grease will help ensure proper sealing of cap.
  • Do not lift or carry by the hose or trigger gun.
  • Securely tighten pump: loose pump can be forcibly ejected.
  • Carefully follow chemical manufacturer's safe handling instructions and recommended precautions/practices when using flammable chemicals. Do not use hot liquids.
  • Do not exceed 45 psi pressure and do not inflate without liquid in the tank
  • Do not fill the tank over 3/4 full. Relieving pressure in an overfill condition can cause harmful venting of contents.
  • Never stand with face or body over the top of tank when loosening pump or relieving pressure.
  • After pumping, be sure the handle is in the locked down position
  • On completion of operation, with the tank in the upright position, relieve pressure in the tank by gently pulling up on the pressure relief valve on the side of the tank.

To Install (refer to diagram on next page)

  1. Turn pump lid counterclockwise to remove pump and lid.

NOTE: Do not remove or tighten the lid using the handle.  Rotational force on the handle can cause damage.

  1. Add chemical solution to the tank. Leaving extra "air space" in the tank and less chemical will give longer spraying time between re-pressurizing. DO NOT FILL THE TANK OVER 3/4 FULL (75%) .
  2. Tighten cap and pump for a good seal. Regular lubrication of cap seal and threads will help ensure proper sealing and removal of cap.
    NOTE: It is a good idea to thoroughly rinse out the tank, fill with water, partially re-pressurize, and discharge to flush out the entire hose/nozzle assembly after use and before storing sprayer.  When using aggressive or corrosive chemicals never leave chemical solution in the tank after use.

To Operate

  1. Pump up sprayer until the pressure relief valve starts to rise/relieve. Less if a lighter spray pressure and volume is desired
  2. Pull the trigger to start and stop spraying. Re-pump up as spray begins to slow down.
  3. On completion of spraying, with the tank in the upright position, relieve pressure in the tank by gently pulling up on the pressure relief valve on the side of the tank.
  4. Prior to every refill of the tank, pull up on relief valve to ensure it is depressurized before removing the lid and pump.
  5. To store: Partially fill the tank with fresh water and pump it up. Pull the trigger and rinse the sprayer out.
925023-E.jpg
Troubleshooting Guide
Problem Possible Cause / Solution
StartupMaintenance
A) Sprayer sputtering
B) No output / unit will not spray
C) Tank will not pressurize and/or hold pressure
1
1
2
2
2
Possible Cause / Solution
StartupMaintenance
  1. Not enough air pressure
    • Pump up the sprayer several strokes
    • Less liquid in the tank will allow for more air pressure to build and spray for longer
    • The air relief valve will rise when maximum pressure is achieved
  1. Air leaks due to loose lid, worn or damaged components/fittings
    • Ensure lid is snug, but not overtight. Lubricate the lid and pressure relief o-rings. Order repair kit and replace damaged o-rings, gaskets, umbrella valve etc. See page 3 for part numbers
    • Refer to the Pump-Up O-Ring Replacement Guide http://appequip.net/uploads/documents/pump-up-o-ring-replacement.pdf
    • The o-ring on the piston (inside the shaft) creates pressure and should be kept well-lubricated since it is exposed to friction from pumping.  Replace as needed.
    • The umbrella valve on the bottom of the piston shaft holds pressure in the tank and needs to form a tight seal.  Do not scratch the valve seat!  Replace as needed.
    • Ensure that your chemical and lubricant are compatible with the o-ring seals for this equipment.  Incompatible chemicals or lubricants can quickly degrade the o-rings.
PREVENTIVE MAINTENANCE: * Prior to storage, empty, clean and dry the foamer. * Lubricate o-ring in pressure relief valve and the piston/cylinder with a compatible non-water soluble grease (such as a silicone lubricant) on a regular basis. * Lubricate tank cap threads and both sides of the gasket to achieve a tight seal and to ease tightening and loosening. * Replace cracked or damaged seals before use.